


Abstracting OpenGL 3-D Model Definition and Rendering with C++.
This article introduces a library of C++ classes which I have named Windows/OpenGL Classes, or WOC for short. WOC leverages the substantial functionality of OpenGL and hides its complexity behind a hierarchy of user-derivable base classes and leaf classes. In addition, a basic Win32 application-andwindowing framework is offered, as well as some very flexible value-generating and member-function-calling class templates whose purpose is to constitute, and relay values around, 'virtual circuits' for the purposes of either animation or geometry generation.
Casual users of WOC, and anyone tempted by the instant gratification of some pretty graphics pictures, are welcome to visit the WOC section of my website at www.barkbark.demon.co.uk/woc . The WOC header and implementation files (127kb zipped) can be found in the same place. This article is aimed at those interested in WOC 'under the hood' but it also includes a first tutorial on its use.
What do I have to know to use WOC?
Because WOC hides the OpenGL API, you don't need to know OpenGL. It helps to have heard of, and to be able to visualise, 3-D cartesian coordinate space and to have the gist of the basic translation, rotation and scaling transformations, particularly the significance of applying either translation or rotation before the other. With the exception of the animation templates, only a very basic knowledge of C++ is required to use WOC; it is in the ballpark of rudimentary MFC. Use of the animation templates is optional but more demanding as it requires a good knowledge of the generic programming techniques of modern C++.
What, briefly, is OpenGL?
OpenGL (Open Graphics Library) was developed by Silicon Graphics and it is a hardware-independent specification of a graphics programming interface. Although windowing tasks and user input are not part of the OpenGL specification, implementations for different platforms all have a standard core of functionality and are packaged with the OpenGL Utility Library (GLU) which does offer a common abstraction of windowing support hiding a specific implementation for each platform. GLU is not a perfect solution and on Win32 I prefer to use the Win32 Extensions.
What does WOC offer?
OpenGL's interface is at the level of geometric primitives - points, lines and polygons - and no higher. WOC also allows the geometry of a 3-D model to be defined at this level, either manually or generated automatically, but also introduces types representing higher-level elements, defined once and referenced many times, in model and scene hierarchies created by the user. WOC controls OpenGL's state transparently and is responsible for managing, transforming and rendering the user's scene and animations. Also, for Win32, the basics of registering and creating windows, a message-loop, window procedure, and creating and managing an OpenGL rendering context and default animated model are all taken care of by WOC upon the instantiation of, in the simplest case, a single Application class object.
The WOC Class Model
At the bottom of WOC's geometry class hierarchy [ class diagram on following page ] is the VectorT template. This represents a vector, or one-dimensional matrix. A vector has magnitude and a direction in space. VectorT is used as a set of either three or four scalar values which together represent a vector-like concept. So, it can be used to represent any of: a set of homogeneous or non-homogeneous coordinates in threespace (i.e. a point); a free vector in three-space (e.g. a normal vector); ray rotations, translations and scalings. The class diagrams shown in the figures are from Rational Rose and give the class names without their generated 'C-' prefixes. I will do the same in this discussion. WOC specialises VectorT with the GLfloat type and typedefs the result to Vector . GLfloat is itself a typedef for the built-in type float . At a similarly low level the UV class represents a set of floatingpoint texture coordinates (u and v, corresponding to the x and y directions respectively) which identify a point on a texture map (an image). A Model instance is a collection of all the 3- D points ( Vector ), lighting normals ( Vector ) and texture coordinates ( UV ) from which its polygons are constructed. This repository of geometric resources is then referenced by Triangle instances so that the points, normals and texture coordinates can be re-used and mixed and matched as required. A logical collection of Triangle s is placed into a Geometry - e.g. the triangles defining the surface of a sphere - also with re-use in mind. Geometries are collected and managed by the Model , but are referenced by the Model 's Group s. I will say more about material and transformation in due course, but a Group applies a Material and a set of Transformation s to a Geometry so that the same Geometry (e.g. our sphere) may be stretched, scaled, translated, textured or coloured many times depending on the properties of each Group which references it.
As you can see, WOC's abstraction of a 3-D model is factored into several classes. It is possible to construct a model at either low, medium or high level as desired. The lowest level involves defining points, normals and texture coordinates and then defining Triangle s in terms of the returned indices of the points. Alternatively, Triangle s can be constructed with their points, normals and texture coordinates as parameters, with the option to re-use duplicate existing points, normals, etc, within a threshold of similarity. Normals are optional: they may be supplied or alternatively WOC will on request calculate face or vertex normals. Finally, the highest (and easiest) level of model definition is afforded by the polymorphic model-loader classes. You simply point these at a Model instance and, together with some optional parameters, instruct them to load. Several model-loaders (cube, grid, tetrahedron, sphere, tube) are built into WOC but you can derive your own. The sphere loader re-uses existing points it has already placed in the Model 's repository, because the spherical to cartesian coordinate conversion formula it uses generates a large number of proximate points at the poles. There is also a model
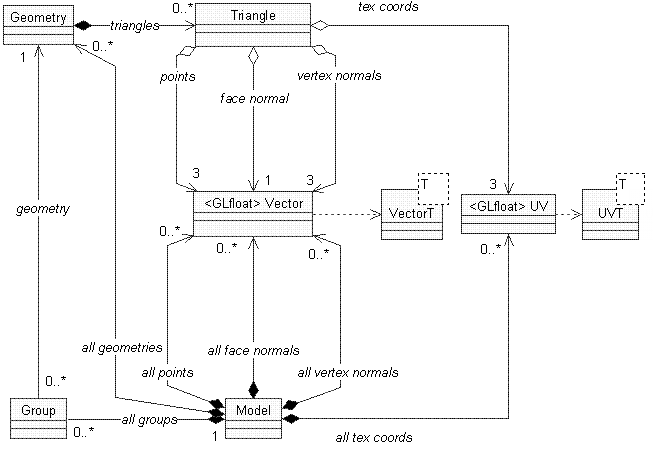
Figure 1. Geometry Classes
loader specialised for reading from a disk file in Wavefront .OBJ format, making it childsplay to build an .OBJ model-viewer with WOC. A more Model -centric view of the classes already mentioned can be found in the WOC Class Reference on my website; I won't reproduce it here.
Let's look at Transformation (s) next.
Earlier I mentioned that a Group applies a set of Transformation s to a Geometry . A Transformation is an abstract base class for Translation , Scaling and two types of Rotation . WOC has a class which is a collection of Transformation -derived types, and is known as a Transformation s. A Transformation s' elements are applied in the order in which they were added because matrix multiplication is not generally commutative. As can be seen in Figure 2, an OGLWnd also has its own Transformation s instance. An OGLWnd is a window with an OpenGL Rendering Context in its client area, and its Translation s and Rotation s are generally sufficient to give the correct view (or 'camera angle') onto the scene as a whole, although Scaling s can be applied if required. An OGLWnd owns a collection of Model s and once the scene itself has been transformed, each Model in the scene is transformed and rendered and that process in turn involves transforming and rendering each Model s' Group s. A Model 's Transformation s collection (not shown in Figure 2) exists so that transformations common to all Group s in a Model can be factored up to the Model . Immediately before transforming a Model or a Group , the current transformation matrix is pushed onto OpenGL 's matrix stack and later popped once the Model or Group has been rendered. This ensures the current transformation always keeps in step with the inorder walk of the scene tree. It probably also bears mentioning that Group s themselves may have a further collection of (sub) Group s in the way that Model s do. This allows the definition of a scene tree to go to any depth and also provides for Group nodes to contain only a Transformation s collection without a Geometry nor a Material ; this provides for further factoring out of Transformation s common to child Group s. The OGLWnd 's Transformation s are accessed by the class's built-in mouse interface which allows the user to translate, rotate and zoom the scene. Mouse sensitivity along with a host of other settings are available from the OGLWnd 's context menu.
Materials are another part of a Model 's repository of resources which are re-usable by its Group s. A Material is essentially a definition of how the triangles in the Group should reflect the colour components of the lights illuminating them. A number of stock Material definitions are built into WOC (e.g. emerald, ruby, pearl, brass, bronze, red enamel, various colours of plastic and rubber to name but a few) so the casual WOC user need never get into the technicalities. The definition of lights is taken care of by the Light class which wraps OpenGL's lightrelated APIs. A Light contains a Model instance which defines the appearance of a Light should it need to be represented visually. By default a Light 's Model is loaded with low-resolution sphere geometry but you can derive from Light and change the Model used. Light s also have their own Transformation s collection so that they can be placed anywhere, or even animated.
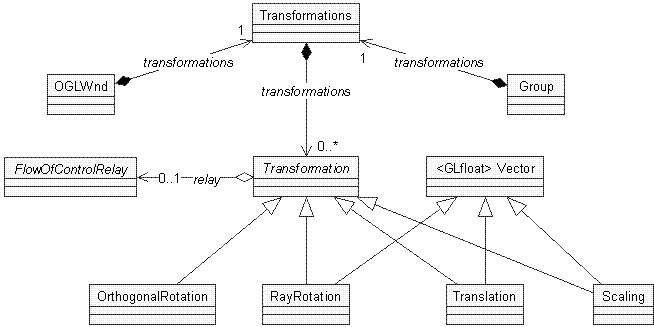
Figure 2. Transformation Classes
The remaining corners of the WOC class model can be explored by checking out the WOC Class Reference on my website.
WOC Tutorial One: A Skeleton Project
To follow along with this tutorial you will need to download the WOC header and implementation files from my website. I recommend that you unzip them into a folder named woc and locate it at the same level as (i.e. a sibling of) the project folders which use it. This is because the projects look for the WOC files at the path: ..\woc\ as we'll see later.
About the tutorial
If you like WOC and find it useful then you may want to use it more than once - perhaps even lots of times. In that case it's nice to have a skeleton or template project to model new WOC projects on. That's where the Skeleton Project (WOCSkeleton) comes in. This tutorial shows you how to integrate the WOC source files into a Visual C++ project, but you can then save the project and re-use it as a starting-point for new projects. You can either follow along with the steps or just download the files of the completed project. Of course you don't have to use a skeleton project if you don't want to, but you'll find it more convenient than following these steps each time you make a new project. For those who are unable to use Visual C++, or who prefer not to, WOC will build under the GNU Compiler Collection (gcc/g++). I have more to say about this on my website.
The steps
Step 1
Launch Visual C++ and use the Win32 Application wizard to create a new project named WocSkeleton. Locate the project folder as a sibling of the woc folder containing the WOC header and implementation files. The steps which follow apply to the 'Hello World' option (on Step 1 of the Win32 Application Wizard), but feel free to choose one of the others if you're happy to add the appropriate files, code and resources on your own to make a minimal Win32 application.
Step 2
Open the file stdafx.h for editing. There is usually a comment near the end of the file indicating where to place your own headers:
// TODO: reference additional headers
your program requires here
Even if you don't have this comment, just find a suitable place near the end of the file before the close of the include guard and type this:
#include "woc.h" // directory path set in
project settings.
using namespace woc;
This is an include of the main WOC header file which in turn includes several other WOC header files. Together these files contain the declarations of all of WOC's types, and some complete definitions. Because I have opted for a using directive, and because stdafx.h is included by the other source files in the project, all names in the woc namespace will now be visible in the global namespace throughout the project without further qualification. If you don't like this, you can omit the using directive and explicitly qualify. At this stage the project doesn't yet know where to find the woc.h file - that's done in step 3. However, you can opt to hard-code the path to the file here (even a relative path) and skip step 3. It's up to you.
Step 3
If a project includes a lot of header files from the same folder, and the name or location of that folder may change, then you wouldn't want to have to edit the path in every #include. Although WOC's include structure presently obviates the explicit including of more than one header file, that may not always be the case. So, if you followed step 2 to the letter then now you'll need to let the project know where to look for additional header files, specifically woc.h. You could make this setting for the whole of Visual C++ by adding a new include file directory on the Directories tab of the Options dialog (Tools/Options... menu), but I prefer to make the setting apply only to the project at hand so that it will easily transfer between Visual C++ installations. To do this, choose Project/Settings..., choose Settings For: All Configurations, choose the C/C++ tab, Category: Preprocessor, and in the Additional include directories: edit box, type:
..\woc\
This is correct for the case where the woc folder is a sibling of the new project's folder. You may choose a different arrangement but, if you do, then you should edit the above include directory path to match. Note that the Additional include directories: edit box may contain more than one path, commaseparated. There is one more change to make whilst you're editing the project settings. Use of the dynamic_cast operator requires run-time type information which is enabled with the /GR compiler switch. So, choose Settings For: All Configurations, the C/C++ tab, Category: C++ Language, and check the Enable Run- Time Type Information (RTTI) checkbox.
Step 4
The project will now compile, but so that it will also link when we come to using the WOC classes, you'll need to add the implementation file to the project's Source Files folder on the FileView tab of the Workspace pane. Right-click the Source Files folder, choose Add Files to Folder... from the context menu, navigate to the woc folder and choose the file woc.cpp . Whilst you're at the FileView tab you can also add all the WOC header files ( woc.h and all the others you'll find in the folder) to the Header Files folder so that all the WOC classes will appear on the ClassView tab.
Step 5
One final step before the project will link is to reference the static library files for OpenGL and the Win32 Common Controls. To do this, choose Project/Settings..., choose Settings For: All Configurations, choose the Link tab, Category: General, and in the Object/library modules: edit box, add:
opengl32.lib glu32.lib glaux.lib comctl32.lib
Now the project will build. Just check that it does.
Step 6
At present the project is using no WOC features and, if you run it, it will behave as it did when it was first generated by the wizard. Now we need to remove most of the wizard-generated Windows code and replace it with a small amout of WOC code. Open the file WocSkeleton.cpp for editing and delete everything from it except the #include directives and the WinMain function. Next, delete all the code from the body of the WinMain function and type this in its place:
// Perform application initialization:
if (!theApp.InitInstance(hInstance,
                         nCmdShow,
                         IDC_WOCSKELETON,
                         IDI_WOCSKELETON,
                         IDI_SMALL,
                         NULL,
                         IDS_APP_TITLE))
{ return FALSE; }
return
  theApp.MessageLoop((LPCTSTR)IDC_WOCSKELETON);
You may be wondering about the identifier theApp - where is it declared? Nowhere as yet, so add the following declaration after the includes but before WinMain:
// The one and only application object.
CWocApp < CWocFrameWnd < CWocOGLWnd > >
     theApp;
The meaning of this code is that we are declaring an identifier named theApp which is of type CWocApp . This is a class template whose single template parameter specifies the type of window to use for the application's main window (defaults to CWocFrameWnd ). The parameter can be any CWocWnd derived class so long as it implements a CreateFrame method as CWocFrameWnd and CWocOGLWnd do. The CWocFrameWnd class is another class template whose single parameter specifies the type of the view window it may be required to use to overlay the client area of the frame window. The parameter must either be CWocWnd (the default) or a class derived from it. Incidentally, the constructor of the frame window object takes a BOOL parameter, defaulting to TRUE , indicating whether or not the frame window is required to create a view. If this parameter is FALSE then the view type is ignored. If we wanted to override the default of creating a view then we have to wait until the application object has created the frame window then call SetCreateView(FALSE) on the frame window at any time, but most logically in an overriden OnCreate handler.
Step 7
Now you can build and run the sample, so let's leave further code editing until the next step whilst we look at some of the default features of the classes. The code that earlier I directed you to insert specifies the view of the main frame window to be an OpenGL rendering context window ( CWocOGLWnd ). When you run the sample you'll see the default behaviour of the CWocOGLWnd class. Firstly, a default 3-D model is displayed which is lit and rotating and its normals are shown. How this happens is that an (overridable) initialiser function in the OpenGL window class (the member is CWocOGLWnd::InitialiseGL if you want to take a look at it) creates a new model object, loads some geometry and face normals into it and then calls a method on the model to require it to show its normals. The model then makes some changes to the OpenGL state to reflect its requirements and, since normals now exist, the model requests the view class to activate lighting and GL_LIGHT0 . The view class also defaults to rotating the scene a small amount on a timer which fires every few milliseconds. The CWocOGLWnd class has two significant features: a mouse interface to manipulate the view transformations, and a Properties Dialog.
Mouse manipulation is a mode which you can toggle into and out of by holding down Ctrl and right-mouse clicking inside the view. When you're in mouse manipulating mode the mouse cursor will disappear and you can manipulate the scene in several ways, even whilst model animation is taking place, by moving the mouse with various combinations of the mouse buttons depressed. With no buttons depressed the view is rotated about the X and Y axes; the left button causes rotation about the Z axis; the right button causes zooming in and out; and both mouse buttons depressed together causes the view to pan.
Getting the OpenGL Window Properties Dialog to display can be done either programmatically by calling CWocOGLWnd::PropertiesDialogDoModeless or by the user double-clicking the right mouse button anywhere inside an OpenGL Window. For a full explanation of all the controls on the OpenGL Window Properties Dialog together with the theory behind them, please see the documentation for the CWocOGLWndPropertiesDialog class (nested within the CWocOGLWnd class) in the WOC Class Reference.
Step 8
Now to reactivate the application's main menu. The project wizard created an About dialog box resource along with a dialog procedure and command handler to display the dialog. Earlier we deleted that code but we still have the dialog resource and, as you'll see, it's very easy to add a handler to your project to handle the menu commands and to create and display the dialog. First, in order to control the handling of specific commands, we need to override the command handling functionality in the default frame window class CWocFrameWnd . Command handlers exist in all of WOC's window classes: standard windows, frame windows and consequently any window used as a view. This means that you can either derive your own frame window and add a command handler to it or do the same with a view window; the only difference being that frame windows get to handle commands before their views. In this case, because the purposes of the menu commands being handled are 1. to close the application and 2. to display the application's About box, the most appropriate place to handle these commands is in the application's main frame window. The plan then is to derive a class from the existing CWocFrameWnd template class and implement the virtual OnCommand method on the derived class. Type the following code into WocSkeleton.cpp immediately before your declaration of theApp :
template < class _TyView = CWocOGLWnd > class
CWocSkeletonFrameWnd :
public CWocFrameWnd < _TyView >
{
public:
  CWocSkeletonFrameWnd
    (BOOL nCreateView = TRUE) :
    CWocFrameWnd < _TyView >(nCreateView){};
  virtual ~CWocSkeletonFrameWnd(){};
  virtual BOOL
      OnMenuOrAcceleratorCommand (UINT nId)
  {
    switch (nId)
    {
      case IDM_EXIT :
        return theApp.Exit();
      case IDM_ABOUT :
      {
        CWocDialog dlgAbout(IDD_ABOUTBOX,
                                        this);
        dlgAbout.DoModal();
        break;
      }
      default:
        return CWocFrameWnd < _TyView
           >::OnMenuOrAcceleratorCommand(nId);
    }
    return 0; // indicate that the message
              // has been handled.
  }
};
So what are the handlers doing? The IDM_EXIT handler is simply calling a method on your application object to destroy the main window and thus quit the application. The IDM_ABOUT handler makes use of the CWocDialog class which in this case needs no specialisation as it handles IDOK and IDCANCEL straight out of the box. The arguments passed to the constructor of CWocDialog are: the dialog's template resource ID, and a pointer to the window object which owns the dialog.
Finally, we have to amend the type of our application object as its main window is no longer the base frame window class but rather the class we've just defined. So replace your theApp declaration with this line:
CWocApp < CWocSkeletonFrameWnd < > > theApp;
And that's it. If you build and run now you'll find that your menu works again. The WocSkeleton is referred-to by further tutorials on my website as they all use it as a starting point. For this reason I suggest you save your project and put it aside if you've been following along, or just download the WOCSkeleton project files if you prefer.
And That's All We Have Time For
I hope this introduction to WOC has been of some interest. Please visit my website if you wish to follow the remaining four tutorials and learn how to define your own models in WOC. There is also a gallery of sample demos built using WOC at:
www.barkbark.demon.co.uk/graphicssamples
Naturally any feedback regarding WOC, good or bad, is welcome via email.
Bibliography
The best introduction to OpenGL is the 'Red Book': Woo, M., J. Neider, and T Davis: OpenGL Programming Guide , Addison Wesley.
The standard computer graphics canon is: Foley, J., A. van Dam, et al: Computer Graphics: Principles and Practice , Addison Wesley.
Aspiring 3-D game programmers are directed to the excellent: Abrash, M: Graphics Programming Black Book Special Edition , Coriolis Group Books.
SGI, Silicon Graphics and OpenGL are registered trademarks of Silicon Graphics, Inc.
